
Gutter Apron vs. Drip Edge: What’s the Difference?
October 2, 2026 7:26 pmWater damage doesn’t announce itself; it works quietly behind your fascia board, under your shingles, and along your roof deck until the rot sets in and the repair bill arrives. As a licensed and insured Iowa contractor with 25+ years of local experience, Seamless Gutterworks has seen what happens when the wrong edge flashing gets installed, or when nothing gets installed at all. Two components sit at the center of most of these problems: the gutter apron and the drip edge. Each has a distinct job. They look similar; they’re both bent metal, and homeowners habitually confuse them, but they do different jobs, and using one where you need the other leaves gaps that water will find. Your gutters are your home’s drainage system: like a roof for your foundation. When they fail, the cost of neglect is high, leading many to ask, what happens if I ignore this?
The Core Differences Between Gutter Aprons and Drip Edges
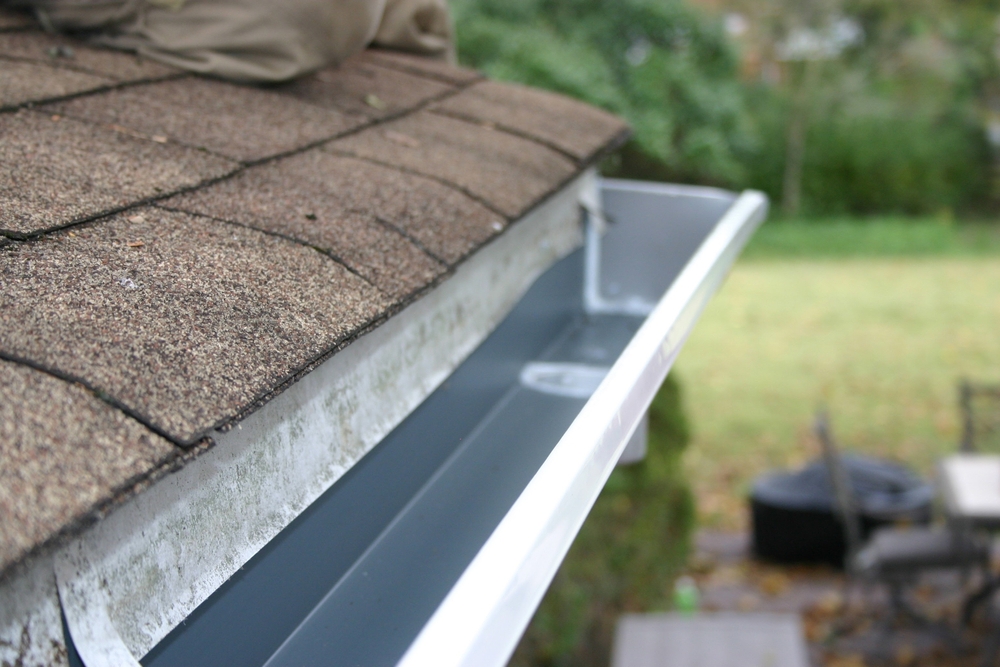
Both components protect your roof edge and direct water away from the structural wood underneath, but they accomplish this in distinct ways and for different roof configurations, depending on whether you have gutters installed or a bare roof edge. A drip edge is designed to extend slightly away from the fascia so water sheds cleanly off the roof without wicking back under the shingles. A gutter apron, by contrast, has a longer vertical flange engineered to hang directly into the gutter channel, closing the gap between the roof deck and the gutter itself.
That gap is where most of the damage begins. Rot follows quickly. When water escapes behind the gutter, rather than flowing into it, it saturates the fascia board and eventually reaches the soffit. If you’ve noticed peeling paint, soft wood, or discoloration along your eave line, that’s the failure pattern. Proper soffit and fascia repair addresses the damage after the fact, but the right edge flashing prevents it from starting. The broader water-shedding system, gutters, downspouts, and grading, only performs as designed when the roof edge feeds water into it correctly. Understanding how gutters protect your foundation makes it clear why this first handoff, from shingle to gutter, matters so much to protect my foundation from water damage.
Knowing which component belongs where starts with recognizing the warning signs that your current roof edge isn’t doing its job. Signs your roof edge needs flashing attention:
- Peeling paint or water stains on the fascia board
- Water dripping behind the gutter instead of into it
- Rotting wood on the soffits or roof deck edges
- Soil erosion or pooling water around the foundation
Understanding the Technical Standards of Roof Edges
Roof edge systems aren’t just a contractor preference; they operate within a framework of tested performance standards that dictate how these components must behave under real environmental stress, ensuring your home remains protected during severe Iowa storms. Standards matter.
Wind Resistance and Building Code Compliance
Metal edge systems installed on low-slope roofs, excluding gutters and counterflashing, must be designed for wind loads and tested in accordance with ANSI/SPRI/FM 4435/ES-1, the test standard for edge systems used with low-slope roofing systems, as established under the International Building Code (per the NRCA Shop Fabricated Edge Metal Testing Guidelines). External gutters that secure the perimeter edge of a roof membrane on low-slope roofs face a separate requirement: they must be tested for wind resistance in accordance with Test Methods G-1 and G-2 of ANSI/SPRI GT-1, the test standard for external gutter systems. These aren’t the same standard, and that difference matters: a gutter system and an edge-metal flashing system are evaluated differently because they interact with wind loads differently. They are tested separately.
Most residential steep-slope applications don’t fall under low-slope commercial code requirements, but the underlying principle carries over: edge metal that isn’t secured and tested for its specific role will fail under the conditions it was never designed to handle. Locally, general building codes require proper flashing at roof transitions to prevent moisture intrusion, even when a specific component like a gutter apron isn’t named explicitly.
Ensuring Long-Term Durability with Certified Systems
The National Roofing Contractors Association maintains active certification programs with UL Solutions and Intertek Testing Services NA Inc. to verify that fabricated edge-metal flashings and gutters meet ANSI/SPRI ES-1 and GT-1 standards. This certification chain matters for homeowners because it means the products a qualified contractor installs have been independently tested, not just manufactured to a claimed specification.
For a complete roof edge system to perform over time, the edge flashing has to work in concert with the gutter it feeds. A properly executed seamless gutter installation eliminates the seams where sectional gutters tend to leak: fewer seams mean fewer places where leaks can start, the same reason spaghetti noodles don’t leak but a pie crust does. Even seamless gutters underperform when the flashing above them doesn’t direct water cleanly into the channel. Flashing is the key. Maintenance compounds this: seasonal gutter maintenance catches debris buildup and early flashing failures before they develop into structural damage.
What is a Drip Edge and How Does It Work?
A drip edge is a piece of metal flashing installed at the roof’s perimeter to guide water away from the fascia and underlying roof deck. Its primary characteristic is a profile designed to create a small gap between the flashing and the fascia, so water breaks away cleanly rather than traveling back along the underside of the roof sheathing by capillary action. Key characteristics of a drip edge:
- Shape: Typically T-shaped or L-shaped, depending on the profile type (Type C, Type D, or Type F are common profile designations in the industry)
- Installation location: Installed on both eaves (the bottom horizontal edges) and rakes (the sloped side edges) of the roof
- Water routing: Extends slightly away from the fascia to prevent water from running back under the shingles or along the roof deck
- Code status: Required by most residential building codes at both eaves and rakes on new construction and re-roofing projects
The rake installation is where the drip edge earns its keep on roofs without gutters. Gables have no gutters. On a gable end, there’s no gutter to catch water: the drip edge simply ensures runoff clears the fascia and drops away from the structure. On eaves where gutters are present, the drip edge works, but it may not extend far enough into the gutter channel to prevent water from slipping behind the gutter in heavy rain events.
What is a Gutter Apron and Its Specific Purpose?
A gutter apron is a purpose-built piece of bent metal flashing designed specifically for eaves where gutters are installed. Where a drip edge creates a clean break away from the fascia, a gutter apron bridges the physical gap between the roof deck and the back wall of the gutter, ensuring that water traveling down the roof has nowhere to go except into the gutter channel. Key characteristics of a gutter apron:
- Shape: L-shaped piece of bent metal flashing with one flat leg and one longer vertical leg
- Installation location: Installed exclusively on eaves; it has no application at the rake because there’s no gutter there to feed
- Water routing: The longer vertical flange hangs directly into the gutter channel, closing the gap that allows water to escape behind the gutter
- Retrofit capability: Can be installed under existing shingles and over existing gutters without a full tear-off, making it a practical fix for older homes where the original installation omitted it
The difference in flange length is the functional difference that matters most. A standard drip edge profile may not reach far enough over the gutter’s back wall to prevent water from escaping in a heavy downpour. The gutter apron’s extended vertical leg solves that specific problem. It blocks the gap.
Schedule a Professional Inspection in Iowa
If you’re seeing signs of water damage at your eave line, the flashing is the first place to look. Seamless Gutterworks serves Des Moines, Iowa Falls, Hardin County, Ames, Ankeny, and Chicago. Call (515) 291-3788 to schedule an inspection.
Preventing Ice Dams and Water Damage in Cold Climates
Iowa winters put roof edge systems through conditions that mild-climate installations never face. The cold is brutal. Ice dams form when heat rising from the attic warms the roof deck, melts snow above the eave line, and sends water running down toward the cold overhang where it refreezes. That ice buildup forces water back up under the shingles, past the flashing, and into the structure.
How Attic Ventilation and Edge Flashing Work Together
Proper attic ventilation is a primary strategy for removing excess moisture, protecting roof sheathing from condensation, and preventing ice dam formation, a point the NRCA Roofing Guidelines and Resources address directly. Think of proper ventilation as a release valve for attic heat: it keeps the roof deck temperature steady so snow melts evenly rather than pooling at the cold eave and refreezing into a dam. Without that thermal balance, even well-installed edge flashing faces water pressure it wasn’t designed to handle alone. Leaks follow soon after.
It’s worth noting that ice damming and water backup can still occur on lower-slope roofs even without gutters present, particularly in valleys and upslope from penetrations. Gutters aren’t the cause of ice dams, but a gutter apron that fails to seal the eave junction gives backed-up meltwater a direct path into the fascia and soffit. The two problems compound each other.
The Importance of Regular Gutter and Roof Inspections
The NRCA recommends biannual roof inspections to check for loose seams, deteriorated flashings, and excessive shingle granules gathering in gutters or downspouts. Granule accumulation in the gutter is one of the more telling indicators that shingles are aging past their effective service life, and aging shingles often mean the flashing underneath them hasn’t been touched since original installation. Leaf guard systems reduce maintenance frequency by keeping debris out of the gutter channel, but they don’t eliminate the need for periodic inspection of the flashing itself. Homeowners often ask: how much maintenance do they need? Gutter guards reduce maintenance; they don’t replace it. Debris still finds ways. Think of a gutter guard as a mesh cover that keeps debris out while letting water flow through: it is not magic, just physics.
Gutter Apron vs. Drip Edge: A Direct Comparison
Choosing the Right Flashing for Your Home
The choice between a gutter apron and a drip edge, or the decision to use both, depends on three variables: roof pitch, gutter placement, and local weather patterns. On a steep-pitch roof with standard K-style gutters, a drip edge alone often leaves a gap at the eave that a gutter apron would close. On a lower-pitch roof, that gap becomes even more critical because water moves more slowly and has more opportunity to find its way behind the gutter.
A gutter apron is highly versatile. Because it can be retrofitted under existing shingles and over existing gutters without removing the gutter or tearing off the roof, it’s a practical solution for homes where the original installation used only a drip edge at the eave. The retrofit process requires lifting the first course of shingles enough to slide the flat leg underneath: a straightforward job for an experienced crew, but one that requires care to avoid cracking aged shingles. Homeowners often ask, how long will this last? It lasts for decades. The answer depends on the quality of the flashing material and the installation, but a professionally installed metal apron can easily last as long as your shingles.
Feature Drip Edge Gutter Apron
- Shape T-shaped or L-shaped L-shaped with longer vertical flange
- Installation Location Eaves and rakes Eaves only
- Best Use Case Roofs without gutters, or with high-back gutters Roofs with standard K-style or half-round gutters
- Water Routing Efficiency Prevents wicking back under shingles Directs water directly into the gutter channel
- Retrofit Friendly Standard on new installs Can be added under existing shingles
- Code Requirement Required on most new construction Recommended best practice; not universally mandated
Protect Your Home with Seamless Gutterworks
We stand behind our work: no sales gimmicks, no pressure. Just honest assessments and installations done right the first time. Call (515) 291-3788 to talk through your options. Here’s what homeowners across Iowa have said about working with us:
“Easy to work with. They were here within a day or two. And done in one day! Excellent work. So happy!” – Robin Hazelwood
“I think our gutters were done within 24 hours of calling to get a quote. Super quick, easy to work with and look great! Would recommend to everyone!” – Tia Blohm
“Arrived when they said they would. good work and clean up. really good crew. would use them again if needed.” – Rod Fuller
“We couldn’t be happier nor more satisfied than with our new gutter and leaf guard system. From the beginning of true professional guidance in helping us with deciding the best gutter system and the best options for the leaf guard for our home to the installation of true experts truly exceeded our expectations! Our recommendation is if you want to have results from someone who completes this project as if it’s their own place, then look no further!!” – David Kruger
“Very happy with everybody and products at Seamless Gutterworks Company. Our new gutters look fantastic. Would highly recommend.” – Julie Herrold
How to Install Gutter Apron Under Shingles
Installing a gutter apron on an existing roof is one of the more accessible retrofits in residential roofing, provided the shingles have enough flexibility to lift without cracking. On newer installations, the apron goes in before the shingles are laid, which simplifies the sequence greatly. Either way, the installation logic is the same. The layers must overlap. When we perform this work, our crew will clean up after themselves, leaving your yard free of stray nails and metal scraps. Steps for proper gutter apron installation:
- Slide the flat leg of the gutter apron under the first course of shingles and underlayment, positioning it so the metal sits flush against the roof deck
- Ensure the longer vertical leg extends over the back edge of the gutter, hanging into the channel rather than resting on the gutter’s outer lip
- Secure the flat leg to the roof deck with roofing nails, spacing fasteners consistently along the length of the run
- Verify that the shingles overhang the gutter apron by a standard distance: enough to direct water off the shingle surface and onto the apron without leaving a gap where wind-driven rain can enter
On retrofit installations, work in sections and check the vertical leg alignment as you go. If the gutter has shifted or settled unevenly over the years, the apron’s vertical flange may need minor adjustment to maintain consistent contact with the gutter’s back wall.
For a deeper look at how modern gutter protection works alongside your edge flashing, explore the research behind leaf guard technology.
Do I Need Both a Drip Edge and a Gutter Apron?
For most homes with standard gutters, the most watertight configuration uses both: drip edge on the rakes and gutter apron on the eaves. This isn’t redundancy; it’s specific roles. The rake has no gutter, so the drip edge handles water shedding there. It keeps water out. The eave has a gutter, and the gutter apron’s longer flange handles the handoff into that channel far more reliably than a standard drip edge profile. Homeowners often ask us, is this worth the investment? When you consider the cost of replacing rotted fascia and repairing water-damaged foundations, installing the correct flashing upfront is always worth it.
When to Use Each Flashing Type for Maximum Protection
Some modern drip edge profiles are designed with a longer horizontal leg that partially bridges the gap at the eave, but they often don’t extend far enough into the gutter channel to fully prevent water from escaping behind the gutter in high-volume rain events. The geometry of a standard K-style gutter, with its back wall set against the fascia, creates a gap that a short drip edge profile simply doesn’t close. A gutter apron’s extended vertical flange is purpose-built for that gap. It seals the opening.
On roofs without gutters, a drip edge on both eaves and rakes is the correct installation. There’s no channel to feed, so the apron’s extended flange serves no function. On roofs with high-back gutters that sit flush against the fascia with minimal gap, a drip edge may perform acceptably at the eave, though a gutter apron still provides more reliable protection against water intrusion behind the gutter over the long term.
The cleaner answer for most homeowners: if you have gutters, use a gutter apron at the eave. Use a drip edge at the rake regardless. If you’re replacing your roof or gutters, it costs very little to install both correctly from the start. If you’re retrofitting, the gutter apron is the component most likely to be missing and most likely to be causing the damage you’re seeing.
Frequently Asked Questions About Roof Edge Flashing
Does a gutter apron go over or under an ice and water shield?
A gutter apron is typically installed underneath the roofing underlayment, including the ice and water shield, at the bottom edge of the roof. This order ensures that any water draining down the roof sheds over the top of the apron and into the gutter rather than pooling at the flashing joint. On new construction, the apron goes down first, then the underlayment laps over it.
Is apron flashing required by code?
Apron flashing is not always explicitly mandated by universal building codes, but many local codes require proper flashing at roof transitions to prevent moisture intrusion. It’s widely considered a best practice for standard roofing installations, and most experienced contractors include it as a matter of course on any job with gutters. The absence of a specific code mandate doesn’t mean it’s optional: it means the code hasn’t caught up with the installation standard that the industry already treats as baseline.
What does a gutter apron look like?
A gutter apron is an L-shaped piece of bent metal flashing with one leg that sits flat on the roof deck and another longer leg that hangs vertically over the fascia and into the gutter. In profile, it looks like a right angle with one side noticeably longer than the other: that longer side is the vertical flange that drops into the gutter channel.
What’s the difference between a drip edge and a gutter apron?
A drip edge is generally shorter and designed to extend slightly away from the fascia to prevent water from running back under the shingles. A gutter apron is specifically designed with a longer vertical flange to guide water directly into the gutter channel. The drip edge manages the break between shingle and fascia; the gutter apron manages the handoff from roof edge to gutter interior.
What is the purpose of a gutter apron?
The purpose of a gutter apron is to bridge the gap between the roof edge and the gutter, directing water runoff into the gutter and preventing it from seeping behind the gutter and damaging the fascia board or soffit. Without it, water that misses the gutter’s opening travels down the back of the gutter, saturates the fascia, and eventually reaches the structural wood behind it.
Proper edge metal integration is the essential bridge between your roof and a high-performance gutter system. A drip edge handles the rake and the basic eave break; a gutter apron closes the gap that a drip edge alone can’t reach. Neither component is expensive relative to the damage that missing or incorrect flashing causes over time, and both are far cheaper to install correctly the first time than to address after the rot has set in. If you’re unsure what’s currently installed at your eave line, or if you’ve been seeing the warning signs described above, the answer isn’t to wait and watch. Take action now. You might ask, who’s responsible if something goes wrong? When you work with a licensed and insured contractor, you get the peace of mind that comes with professional liability coverage and a team that stands behind their work.
Get a Professional Roof Assessment from Seamless Gutterworks
Seamless Gutterworks serves homeowners across Des Moines, Iowa Falls, Hardin County, Ames, Ankeny, and Chicago. Schedule a professional roof assessment to find out exactly what your roof edge needs: no guesswork, no upsell pressure. Call (515) 291-3788 today.
Categorised in: Gutters
This post was written by admin
Comments are closed here.